October 26, 2012

Winter Deer

I made this card and yesterday's together, trying slightly different things with them, but using a lot of the same materials.  I used a ripped piece of paper to make the edge, which I then inked up.  I added liquid applique on the trees and in a few places on the ground.  The deer are coloured in with a marker.

Supplies:
Cardstock: Recollections
Stamp: Stampendous - Winter Trees
Ink: Memento
Markers: Crayola
liquid applique

October 25, 2012

Winter Valley Card

I've got another Christmas card for you today.  I used an embossing folder I bought some time ago and used for the first time on this card.  It's a valley with trees and just screamed winter holiday.  I also used liquid applique for puffy snow (once it's dried overnight and heat gunned).  My 'ink painting' still isn't the best, getting smears everywhere, but luckily this card doesn't need to look polished to look good. :)

Supplies:
Cardstock: Recollections
Stamps: Stampendous - Winter Trees, Technique Tuesday - Treemendous (snowflakes)
Ink: memento dew drops
Embossing Folder: Crafts Too - Pine Tree Scene
liquid applique

Posts will be sporadic for the next few months...

With Christmas coming, I'll be working more hours at the store than usual, meaning I'll have less time for card crafting and blog posting.  I'm hoping to still have at least 2 posts a week, but expect things to be more haphazard until the holiday season is over, and thank you for visiting!

October 19, 2012

Shoe Panel Card

I liked the design of yesterday's card, and so made another using a different stamp.  Turns out this is an easy way of making your own patterned paper.  I used two shades of purple ink and repeated the shoes upside down, to give it the look of professional paper.  As with the other card, I also scored it along the top and bottom.
Supplies:
Cardstock: Recollections
Stamps: Imaginisce - Sole Sisters Stiletto Snag Em Mini Stamp, Whiff of Joy - Magical Wishes
Ink: Memento dew drops
Martha Stewart Score Board

October 18, 2012

Tropical Flowers Card

I saw someone do this style of card elsewhere (unfortunately I couldn't find the site I got this from).  The idea is to do a stamped panel across a plain card with a sentiment at the bottom.  I added a few crease lines with my score board for added effect.  

I had some trouble with the stamp and ended up doing the panel several times (at which point I had trouble with the ink - the pink didn't want to wash off so I ended up with some orange bits).  Tomorrow's card, using the same style, worked out better.

Supplies:
Cardstock: Recollections
Stamps: Imaginisce - Hibiscus, Whiff of Joy - Magical Wishes
Ink: Hero Arts fluorescent yellow, pink
Martha Stewart Score Board

October 17, 2012

Lingerie Card

My husband doesn't believe I'll post this card, but I thought it looked great so here goes.

I saw this shaped card on Will Run For Stamps and loved the design.  The post links to Stamp Owl, where you can still find the template for free. :)

I put the template into my Silhouette and created a cut file.  I did a test cut with cheap paper, then cut the bra and panties out of a more expensive, red fuzzy paper.  The base is cream paper.  I used lace from my stash, tucking the edges under the red paper so they wouldn't show up top and made little bows as accents.

I didn't glue/tape the inside curve of the bra, so that I could stuff parts of my husband's present in them.  Note, this requires making sure the sides of the bra are glued/taped VERY well or they'll pull off with the stress.  It makes a great gift card holder for that someone special in your life.  And while I used one, you don't need a cutting machine to make it!

Enjoy!


October 10, 2012

Less Is More: Silver

Less is More's challenge for this week is using the colour Silver in a card.

What a perfect challenge for doing Christmas cards with my new JustRite stamp: Snowfall Background Stamp.  I love this stamp and had to get it. :)

I tried the stamp with a few different coloured metallic inks on different papers.  The ink over the whole page made the edges curl, so photographing these was... interesting.  Here are two:
Platinum ink on black paper.
Silver ink on white paper.
I think the dark paper works great for this stamp, so I think I'll stick with that in the future.  I used pigment inks, so I had to wash off the stamp quickly - and with soap - to get it properly cleaned off (I don't have stamp cleaners as I'd probably forget that you shouldn't use them on clear stamps).

Supplies:
Cardstock: Recollections
Stamps: JustRite - Snowfall Background Stamp, Kaiser Craft - Clear Stamp set Christmas,  Stampendous - Winter Trees
Inks: Brilliance Dew Drop Platinum, Encore Ultimate Metallic Silver, Memento Dew Drop Red

October 7, 2012

Core'dinations Christmas Card

Like a lot of companies, Core'dinations is having a contest for yesterday's World Card Making Day.  Since I own Core'dinations cardstock (you have to use some to enter the contest) and don't use it often (because it's expensive and I want to 'save' it), I decided to try the challenge.  After all, it's no good to have a lot of pretty papers if you never use them, right?  And it gave me the chance to try some new things.  Like paper ripping.  I like clean cut lines, but Core'dinations papers look awesome ripped, so I gave it a go.
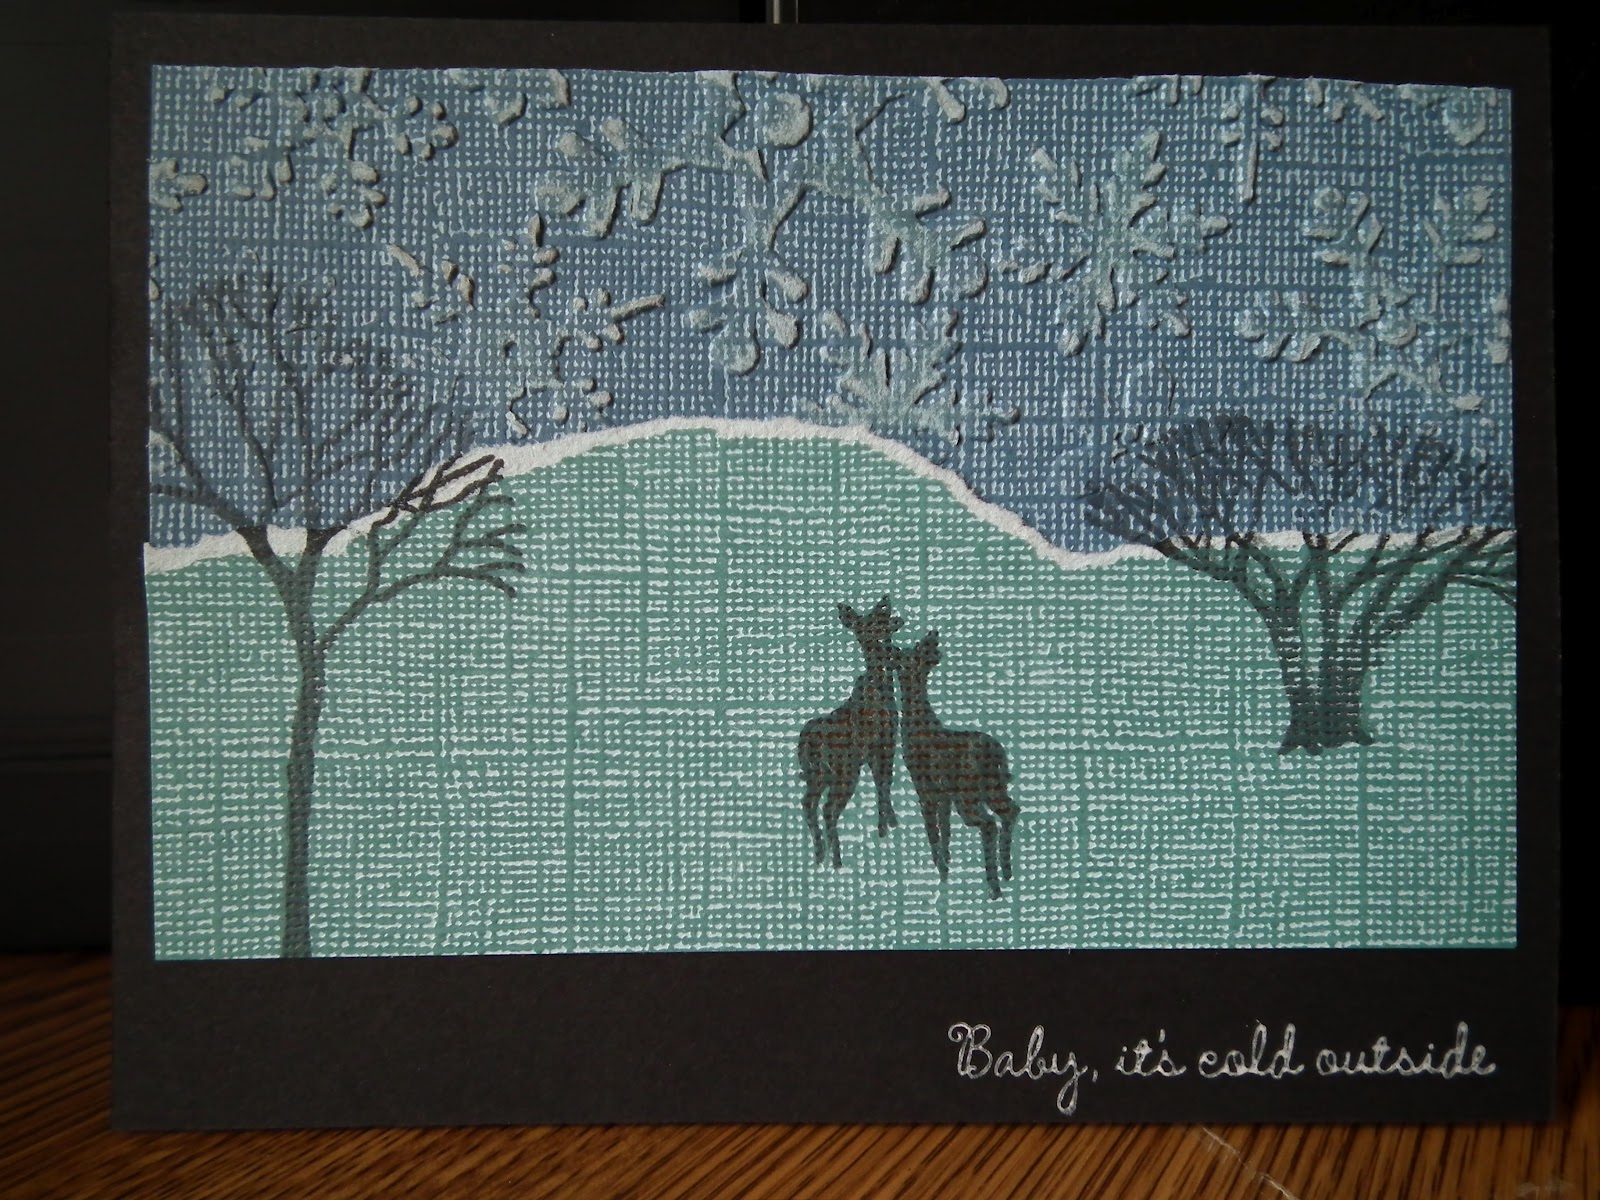
Here's my card:
It was more complicated than most of the cards I've made recently, if only because it uses several papers, stamps and an embossing folder.  I cut the sides of both pieces of Core'dinations cardstock so they'd fit the card, then ripped the green piece.  I cut the blue so no black would show underneath.  Then I taped the two pieces together and stamped the trees, allowing for overlap.

I took the papers apart and embossed the blue sheet, pressing down on the snowflakes that formed over the tree tops so they wouldn't look strange, then very lightly sanded the snowflakes so they'd show up better.  Meanwhile, on the green sheet I stamped and coloured the deer.  I taped te papers back together again to place properly on the card base.

I stamped the sentiment before using a tape runner to affix the top layers.  The green overlapped a bit too much, so I added a few drops of glue so it would stick to the blue and not pull off the card.

Supplies:
Cardstock: Core'dinations Flower Power, Recollections
Stamps: Stampendous - Winter Trees, Technique Tuesday - Treemendous
Ink: Memento, Versa Magic - white
Marker: Crayola
Embossing Folder: Sizzix - Christmas Set 3
glue, tape runner, sandpaper

October 6, 2012

Christmas Ornament Card

Today is World Card Making Day!

While I made two Christmas cards yesterday, I decided I needed to do some card crafting today too.  I spent some time this morning on my Silhouette, making Christmas ornament templates, then cut out a bunch in different colours.

My husband suggested doing a hanging ornament card, so that's what I did.  The colours on the card are a bit washed out, the backing is a light beige not white.
I made enough ornaments to do a ton of cards, though dealing with the jewelry wire was a bit of a pain so I don't think I'd do any more free hanging cards (or use thread instead).  I also have plans to use stamps to make the ornaments look cool.

Supplies:
Cardstock: Recollections
ribbon (stash)
thin jewelry wire
Stamp: Stampendous - Winter Trees
Ink: Memento

October 5, 2012

Book Review: Pop-Up Cards by Mari Kumada

Pros: explains how to make several types of interactive cards, easy to follow step by step instructions

Cons: instructions and templates are separate, so you'll be doing a lot of page turning when making your cards

This book teaches how to make 6 types of pop-up cards, in addition to sliders, flappers, spinners and cards that spring (the pop-up piece moves into view as the card opens).  The instructions are fairly clear, but you'll want to keep them handy - at least the first time you try a new type of pop-up.  Of the four cards I recreated, three turned out wonderfully.  The fourth didn't, as I glued where I shouldn't have.  So caution is necessary, as glue in the wrong place will ruin most of these designs.

The designs themselves are attractive.  Printable colour templates for all the cards are available at the back of the book.  There's a good range of occasions covered (Birthday, Christmas, Valentine's Day, Thank You and Wedding/Baby) and a decent number of examples for each technique taught.

My only complaints are that you have to flip through the book a lot as the basic lessons, card instructions and templates are all in different areas and that there are no ideas for the fronts of the cards, only the insides.  Also, given the difficulty of some of the techniques, some of them are easier than others to modify.  For example, using a car and garage slider card instead of the Penguin on an Ice Floe would be easy.  You're not taught enough about the mechanics behind pop-ups to create your own free hand designs though.

Final verdict: the book teaches some great techniques and has enough variety and templates to keep you busy for a while.

Cards That Spin: Dahlia

This is the last of the cards I made using the patterns from Mari Kumada's Pop-Up Cards book. There are quite a number of designs in the book that I'm not showing on my blog (like the spiral card on the book's cover).

For this card, Amazing Card 4: Cards That Spin: Dahlia, I had to print the dahlia in red on cardstock and then cut the accompanying pattern out with my silhouette. The two pieces of cardstock are attached with a black brad in the center. The card spins when you turn the red paper that's sticking out of the black cover. This looks awesome when the card's spinning.

Like the patterned pop-up I did earlier though, it's difficult to make your own spin designs, so you're 'stuck' with only the pattern from the book (which, as I said above, looks awesome).

October 4, 2012

Pop-Up Cards: Hungry Kitty

Today's Pop-Up Cards card is: Amazing Card 2: Cards that Flap: Hungry Kitty.  This is a card that required a close following of instructions.  As with the other cards, I copied the template into my silhouette and cut them out (the kitties, fish and plates).  The house and flap I hand cut.

Despite reading the instructions more than once I still managed to put one of the cat figures in the wrong place.  The point of this card is that you see the kitty on the front with the fish on the plate.  You flip the tab and there's the second (hidden) kitty with the fish bones.  You're supposed to put the kitties in particular places so that they A) are hidden by the flap and B) don't interfere with the flap.  I got A, but messed up B with the first kitty.  As a result, my flap doesn't work quite the way it's supposed to.  Still, an interesting technique.


October 3, 2012

Sliding Card: Penguin on an Ice Floe

 Note to self, don't leave so much time between making cards and taling about them, especially if they're for a book review.  I remember making this card, but I don't quite remember how the slider works anymore. :(

Again, this card is from Pop-Up Cards by Mari Kumada.  It is from the end of the book: Amazing Card 1: Cards that slide left and right: Penguin on an Ice Floe

I cut the circle tab and penguin on my silhouette, and possibly the ice floe (though I may have done that by hand).  I remember getting the penguin on the folded paper attached to the slider was challenging - not because it was hard, but because I wasn't sure if I wanted the penguin high on the tab or low.  I believe I did that twice as I wasn't keen on the first placement.

I seem to remember that the penguin is on a black folded tab, attached to the pull paper.  The pull tab is just folded paper with a circle on one end.  The slit in the ice floe was cut with a craft knife.
Anyway, here's the card.  Unlike the ballerina from yesterday, this is a technique you'd be able to apply to numerous designs (a mouse up a clock, a cat chasing something, a rocket ship blasting off, a train moving).

In the picture above, the penguin is at rest.  In the bottom picture it's actively chasing the fish that's on the pull tab.  The tab is also a great place for a sentiment (and I believe the example card in the book has one there).

This is a great card style for slightly older kids (ones who can use the pull tab without ripping the card).

October 2, 2012

Book Review: Pop-Up Cards by Mari Kumada: Ballerina Dancing Onstage

I made these cards several months ago when I got Pop-Up Cards as a review book from NetGalley.  While I wrote down my end review at that time, I didn't write down how each card went, so I'm doing that from memory.

Though the book teaches several techniques for doing pop-ups I only tried 4 of the cards.  Unlike with the other book review I did, with this book I copied the cards exactly, so you'll only see my cards rather than the lesson card and how I modified it.  Given the nature of pop-ups some of the lessons are easier to modify than others.  Today's ballerina card, for example, is unalterable unless you get another book that goes into more specifics on how to design your own pop-ups.  The book includes the instructions to make this card, and the templates you need in order to cut out the curtain and ballerina, but not the instructions to design your own form cut pop-up cards.

This card is from the first lesson, Horizontal-fold Cards with 90 degree Pop-ups: Ballerina Dancing Onstage.

I traced the ballerina template into my Silhouette and cut it out that way.  For the pop-up curtain I placed the template on my paper and cut it out using a craft knife.  Be very careful with the folds, as I accidentally folded the bottom of the curtain where it was supposed to remain flat (the area on the center crease line).

 I used a punch on the end to make the edging prettier and gussied up the dancer with some clear glitter glue.
My main complain with this book is that there are no ideas for the fronts of cards, so this pop-up card is still unfinished.

Supplies:
Cardstock: black - Recollections, pink - light stash paper (dollar store), specialty burgundy? - stash (dollar store)
Punch: Martha Stewart Edge Punch Quilted
glitter glue