
February 9, 2018
Floral Challenge Card
I made this card for Papertrey Ink's 11th Anniversary Floral Challenge. I started with a piece of white cardstock and used a tape runner to affix a piece of translucent vellum to the front. I stamped a few flowers from the Daydreamers set, as well as a sentiment from the same set, on the vellum. I used blue and purple inks, blended a bit on the stamps themselves to add interest.

February 6, 2018
Papertrey Ink Sketch Challenge
I made this card for Papertrey Ink's 11th Anniversary sketch challenge. The sketch I worked off of is this one by Dawn McVey:


Here you can see a close-up of the butterfly layers:


I used regular white cardstock as the base and cut an oval out of a textured heavy weight cardstock. I then embossed it with a trellis design. I used a tape runner to attach the oval and then stamped leaves from the Daydreamer stamp set around 2 edges. I stamped some flowers from the same set and fussy cut them out, then used foam adhesive to attach them to the page. I used the Beautiful Butterfly die and cut out of four paper butterflies (vellum, medium shade purple, dark textured purple, and the same white as the oval). I stamped 'Birthday Wishes' from the Up, Up and Away set in purple on the second butterfly (thinking you would be able to easily see it through the vellum), then glued the layers together. Once they were dry I decided to stamp the sentiment again in a light purple ink on the vellum to help it stand out more. I also added some purple rhinestones before using foam tape to attach it.


May 14, 2017
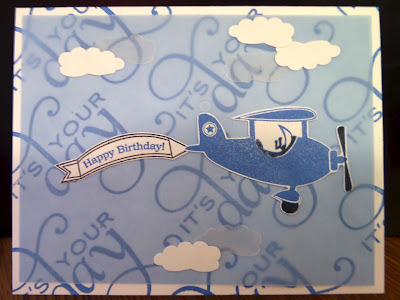
Birthday in the Clouds
I made this card for Papertrey Ink's Make it Monday Challenge: Background Stamping with Sentiment Stamps.
The vellum clouds are hard to see in the picture above, so here's a side detail.


I stamped "It's Your Day" from Think Big Favorites 2 on a white card base in blue ink. I didn't want the sentiment to be too overpowering, so I used a piece of blue tinted vellum as a sky overtop. I stamped one of the planes from the Fly Away mini set, along with the banner and sentiment and fussy cut them out. Just as I glued the plane to the vellum I realized I should have used pop dots to attach it. Ah well. I punched out clouds from white cardstock and thick vellum and glued those down as well. Finally I used glue under the clouds and airplane to attack the vellum panel to the card base.
The vellum clouds are hard to see in the picture above, so here's a side detail.

April 14, 2017
Easter Egg Tree
My parents always had an easter egg tree for hand made blown eggs. It always had pussy willows and branches to hang the eggs on.
Well, I decided it was time for me to have a 'tree' to hang the eggs I've been making. In addition to the pussy willows, I added a cattail, some dollar store branches (one with mini eggs and one with little buds and butterfly beads). At the bottom are foam roses (also dollar store). To light it, I added a string of blue butterfly fairy lights.

Well, I decided it was time for me to have a 'tree' to hang the eggs I've been making. In addition to the pussy willows, I added a cattail, some dollar store branches (one with mini eggs and one with little buds and butterfly beads). At the bottom are foam roses (also dollar store). To light it, I added a string of blue butterfly fairy lights.

March 14, 2017
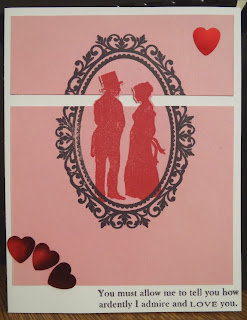
Transformation Card
For their 10th Anniversary Papertrey Ink's set up a series of challenges, one of which is to transform a card you weren't happy with into one you are.
This is the original card using the Simply Jane stamp:
While I liked the Valentine's Day colours, I didn't like what elements I made each colour and the layout was not the best.
Here's my transformed card:

I made it an easel card. I die cut two frames in addition to the stamped frame. I also added some stamped flowers from the set (the bouquet) in light pink to the base cardstock. The easel is held open with a heart button.
This is the original card using the Simply Jane stamp:
While I liked the Valentine's Day colours, I didn't like what elements I made each colour and the layout was not the best.
Here's my transformed card:
I made it an easel card. I die cut two frames in addition to the stamped frame. I also added some stamped flowers from the set (the bouquet) in light pink to the base cardstock. The easel is held open with a heart button.
March 11, 2017
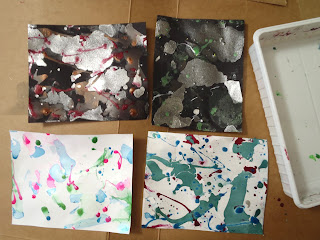
Nail Polish Marbling Background
I made this card for 2 challenges, Papertrey Ink's Make it Monday nail polish marbling and Simon Says Stamps' making your own background.
I took a plastic container from a frozen item, washed it, and half filled it with water. I then added drops of nail polish on top and carefully put a piece of cardstock (2 white & 2 black) on it, marbling the cardstock. You have to be quick or the nail polish will start to harden (well, it created a film that didn't transfer properly anymore).
I found that some of my nail polishes worked great for this, spreading out or streaking, while others didn't want to drip into the container at all or sank to the bottom.
Here are the 4 panels I did:

For my card, I stamped a sentiment from the Daydreamers set by Papertrey Ink in black ink into the bottom right corner. It got lost in the nail polish, so I stamped it again on a piece of vellum and folded the vellum around the back of the card to attach it to the panel. I then mounted the panel onto a blue card.

March 3, 2017
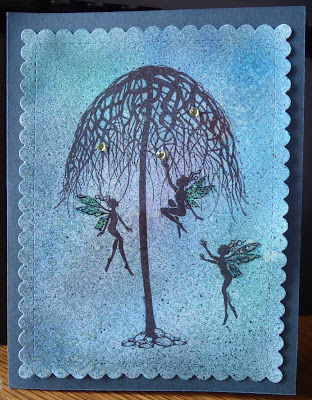
Picking Fairy Fruit
I made this card for the Lavinia Stamps monthly challenge, sparkle and bling.
I started out by die cutting a panel to do my stamping, then used a Crayola airbrush machine to add some colours. I also sprayed it with shimmer mist so the whole panel glitters.
I stamped the wishing tree, without inking the base, then inked the base further down the card. I filled in the trunk with ink using a sponge. This made the tree tall enough to fit the 'three dancing fairies' underneath the branches. I stamped them in and used glitter glue on the wings. For some extra bling, I added some rhinestone 'fruit' that the fairies are picking.
I attacked the panel to a dark blue cardbase.


Subscribe to:
Posts (Atom)