Showing posts with label homemade embossing displacer. Show all posts

December 13, 2012

Homemade Embossing Displaced Ornament Card

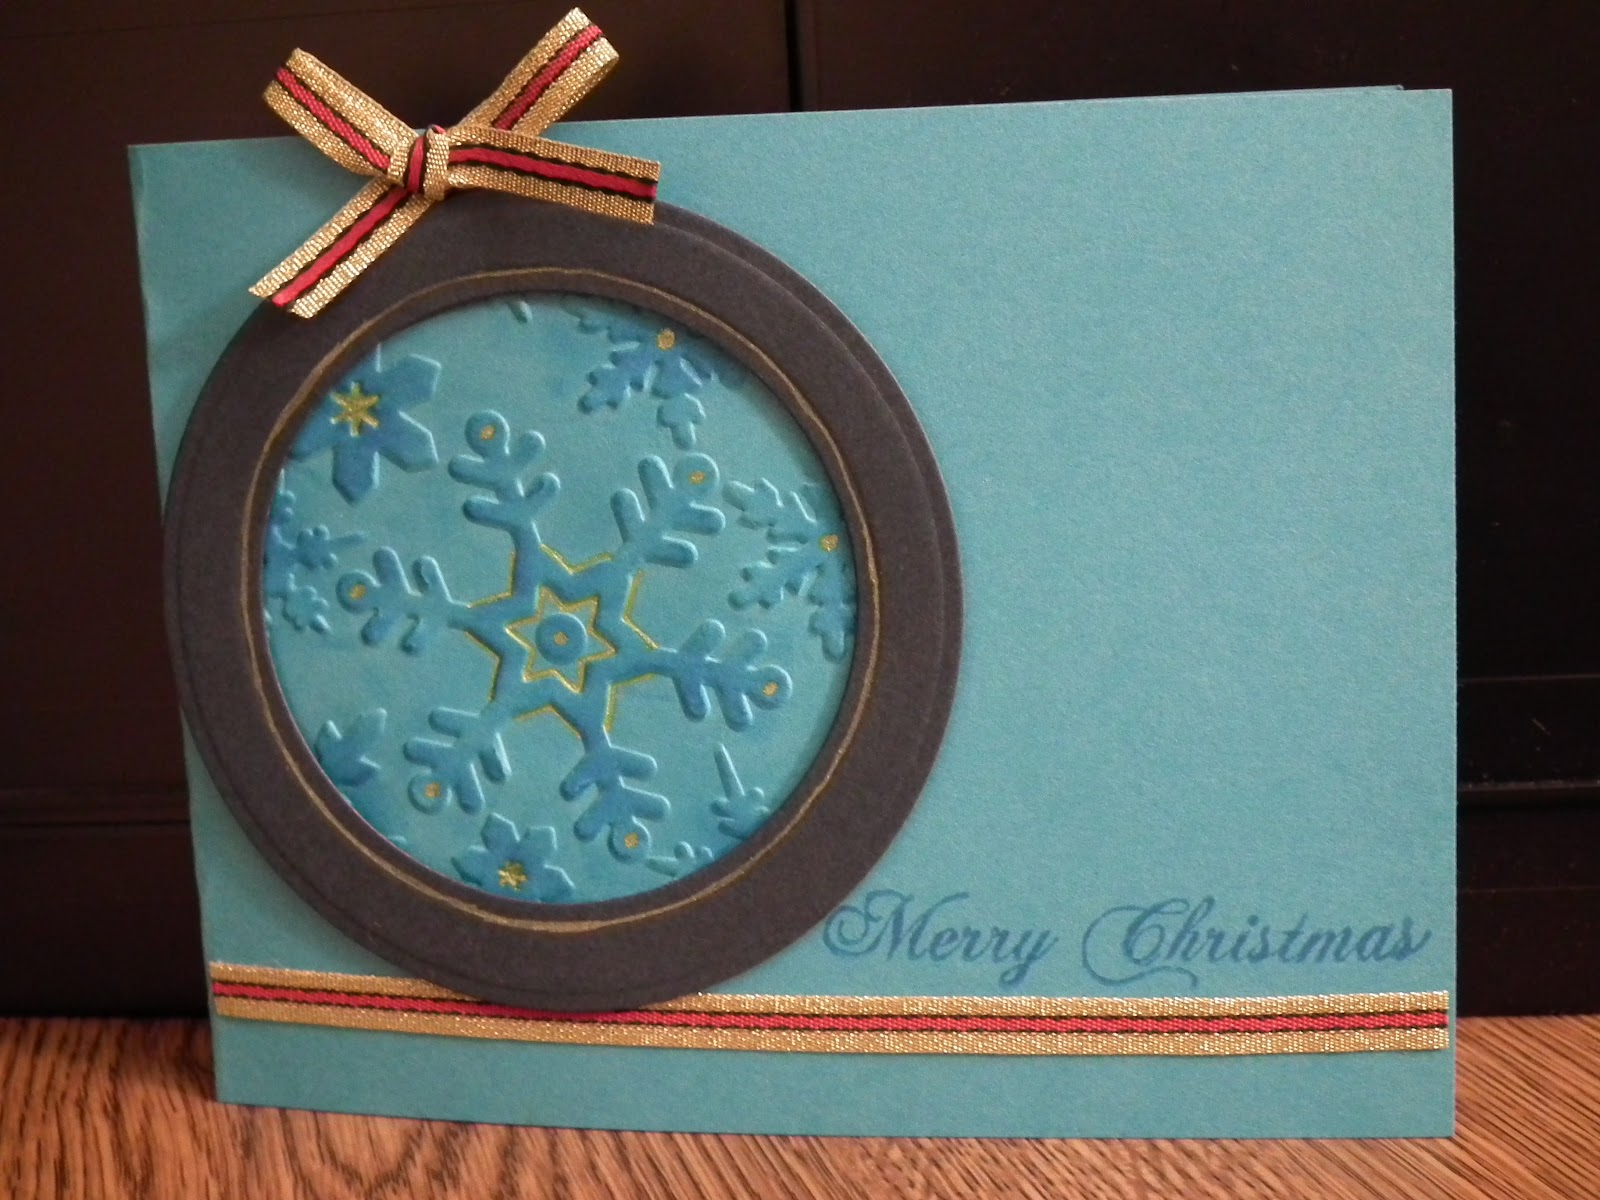
I picked this blue because I don't really like it and I didn't think the homemade embossing displacer would work well for the circle.  Well, it worked beautifully so I had to figure out what to do with the card.  The idea for an ornament came to mind so I cut out a circle that could fit around the embossed area.  In retrospect I should have chosen a dark blue rather than white.  I also should have use my Memento blue ink to darken the embossing area before adding the white ring (as I got a bit of blue ink on it).  I used a gold gel pen to make swirls on the ring and add some colour to the snowflakes.  I also added an ornament topper in gold ink and ribbon.  The sentiment is from Kaiser Craft's Christmas sentiments set.

When I was writing up my Christmas cards I realized I REALLY didn't like this one.  So much so, that I was too embarrassed to assign it to anyone on my list.  Having received my Spellbinders Classic Circles Small in the mail the previous day I decided to try something to fix this.  It was my first time using Spellbinders.  Since I have a Silhouette I didn't want to spend more money on dies, especially simple ones like circles.  But... I've seen techniques that are easier to do with dies, like placing a hole on a particular point on a card (which is hard to do with precision on a Silhouette), etc. that I wanted to try.  I also like the embossed edge Spellbinders give.  Anyway, I was surprised by how much the dies cut into my acetate cutting pads.  Up until now I've only used my Big Shot for embossing, which keeps the acetate nice and clean.  I now understand why people suggest turning the acetate over when die cutting, so they last longer.
 The acetate is quite reflective, so you can't see the circles too well, but there are 4 of differing sizes cut into the pad.

I also got to finally use the crease pad I bought about a year ago, thinking it was the rubber pad, and the rubber pad I got yesterday.  Together, they add up to the thickness of a cutting pad and let you emboss the Spellbinders dies.  (The die came with a different sandwich that called for a tan rubber mat, but my sandwich worked fine and doesn't require me to buy another mat to use.)

I decided to cover the white circle, which just looked odd, with a dark blue one.  The embossing on the circle helped make it look more professional.  I also went over the gold again, with a pen that looked less yellow.  I should have used silver for the accents instead of gold.  Ah, well.  Live and craft some more.

Here's the new finished card.

December 12, 2012

Homemade Embossing Displaced Card

So here's the first card I made.  The center is flat, allowing me to stamp my sentiment with an embossed 'wreath' of snowflakes around it.  I used a piece of plastic Christmas wrap ribbon on the side to complement the sentiment.

Supplies:
Cardstock: Recollections
Stamp: sorry, I bought this last year and threw away the packaging so I don't know what company it's from.  It's a set of Christmas cling stamps Michaels had on sale. :)
Ink: Memento red
Markers: Crayola green
Ribbon: stash
Embossing Folder: Sizzix Christmas set 3, homemade embossing displacer

December 11, 2012

Homemade Embossing Displacers

Earlier this year I saw embossing displacers (also called diffusers) for sale at different crafting stores.  The idea is that one of the plates you use in your embossing machine sandwich is replaced with a plate of equal size that's got a shaped hole in it.  Wherever the hole is, the embossing folder won't emboss.  Similarly, if you use the cut out shape, you can emboss ONLY where the shape is.

I wanted to see if I could make my own embossing displacers before I bought some and finally got around to trying this.  My problem with the store bought ones is that you're stuck with the hole in whatever position the manufacturer put the hole in (because the plates are made to a specific size you can't put them anywhere.  So if there's an oval at the bottom of the panel you can make your hole at the bottom or the top, not the sides because the plate won't fit through your machine that way (they're longer than they are wide, unless your card is short enough to go through sideways.  Similarly you can't put the hole at the center of the card without running your card through the machine a few times making sure your circle is in the same place as you point it up and then down to get the embossing all around).  Anyway, I thought if I could make my own panels I could do any design I wanted (circle, oval, heart, etc.) anywhere I wanted on my page.

So I took a heavy piece of cardboard and cut out a circle using a craft knife.  I also wanted to see if I'd need to cut the circle into all my pieces or just have it one piece thick with a full piece of cardboard behind it.  I ended up cutting circles out of two pieces of cardboard to make sure the image would be deep enough to not interfere with the embossed area.  
My hope was that if it worked I could set up a system where all I'd need to change for displacing would be the top layer (the one that goes next to the embossing folder).

Well, it worked.  I used the panel with the hole to emboss a piece of white cardstock, and the two cut out circles to emboss the blue.  As you can see, there's a segment where each one has not been embossed.  

I used a Sizzix Christmas set 3 embossing folder for the cards.  When you place these in the machine, you have to sandwich it so that the hole/shape is next to your embossing folder with the solid parts towards the top.

My design may not be as crisp in definition as the professional ones (I haven't seen any in person so I don't know if they are or not) but they look pretty good.  I can see doing hearts and embossing them in specific areas on the page for a Valentine's or Anniversary card...

Here are all the layers I used for the displacer.  In order to emboss you need your displacer to be the same width as the top plate you'd normally use.  The first photo is all my layers next to my Bigshot top plate.  I ended up with two circles (or cut out circles), two other pieces of heavy cardboard and two shims of thin cardboard (the stuff you get from pantyhose packages).  You may have to experiment with the width depending on the cardboard you use and your machine.


 Check back tomorrow to see the first of the finished cards.